How to Oil a Butcher Block isn’t just routine maintenance – it’s the key to preserving your kitchen’s most hardworking surface. Done right, oiling prevents cracks, bacteria, and dullness while enhancing the wood’s natural beauty. With the right oil and a simple step-by-step process, your butcher block will stay durable, sanitary, and stunning for years.

Why You Need to Oil a Butcher Block
Wood exists as a natural material composed of cellulose fibers that contract and expand based on moisture content. Without regular conditioning, these fibers lose their structural integrity, leading to surface damage and compromised food safety.
Oiling serves three critical functions that distinguish proper maintenance from neglect:
- Prevents structural damage through fiber hydration: Wood fibers require consistent moisture to maintain flexibility. Dry fibers become brittle, creating cracks that harbor bacteria and weaken the surface structure. Regular oiling penetrates deep into grain patterns, keeping fibers supple and preventing warping.
- Creates protective barriers against contamination: Properly oiled surfaces resist bacterial infiltration and prevent absorption of food odors and stains. The oil fills microscopic pores in the wood, creating a barrier that makes cleaning more effective while maintaining the wood’s natural antimicrobial properties.
- Enhances visual appeal through grain nourishment: Oil brings out the natural color depth and grain patterns in wood species. Well-maintained butcher blocks develop a rich patina that improves with age, making them both functional tools and attractive kitchen features.
The distinction between oiling and sealing matters for food preparation surfaces. Sealing involves applying synthetic coatings that sit on the wood surface, while oiling penetrates the wood structure. Food-safe oils allow the wood to breathe while providing protection, making them suitable for surfaces that contact food.
Read more: Best Wood for Butcher Block: Complete Guide
How Often Should You Oil a Butcher Block?
Oiling frequency depends on the block’s age, usage patterns, and environmental conditions. New butcher blocks require intensive initial conditioning, while seasoned surfaces need maintenance applications.
Fresh butcher blocks from manufacturers arrive with minimal conditioning and require saturation treatments. Apply oil weekly for the first month, then transition to bi-weekly applications for the next two months. This intensive schedule allows the wood to absorb maximum oil and establish protective barrier layers.
Seasoned blocks that have undergone initial conditioning need monthly maintenance applications for regular kitchen use. Heavy-use commercial environments may require bi-weekly treatments, while decorative blocks used occasionally can extend intervals to every six to eight weeks.
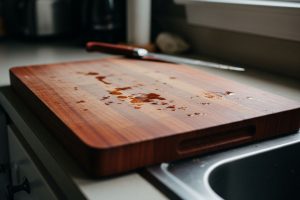
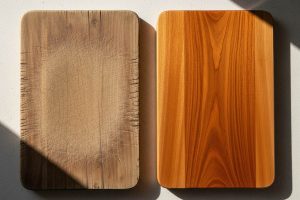
Visual and tactile indicators signal when oiling becomes necessary. Wood appears dull or ashy when dry, feeling rough to the touch. Water droplets absorb quickly into thirsty wood rather than beading on properly conditioned surfaces. Seasonal changes affect wood moisture content, requiring adjusted schedules during winter heating seasons or humid summer months.
| Block Type | Initial Frequency | Maintenance Schedule | Visual Signs |
|---|---|---|---|
| New Block | Weekly for 4 weeks | Monthly thereafter | Raw wood appearance |
| Seasoned Block | As needed | Monthly with regular use | Slight dullness |
| Decorative Block | As needed | Every 6-8 weeks | Noticeable dryness |
Best Butcher Block Oil Options (Comparison & Recommendations)
Selecting appropriate oils for butcher blocks requires balancing food safety, durability, cost considerations, and application ease. The market offers several viable options, each with distinct characteristics.
Food-Grade Mineral Oil
Food-grade mineral oil serves as the industry standard for butcher block maintenance. This petroleum-derived product undergoes refinement processes that remove impurities, making it safe for food contact surfaces. Mineral oil never goes rancid, provides consistent protection, and costs significantly less than specialty alternatives.
The oil penetrates wood fibers effectively without leaving residue or affecting food flavors. Most hardware stores and kitchen supply retailers stock food-grade mineral oil, making it readily accessible for regular maintenance schedules.

Beeswax Blends
Beeswax combinations offer enhanced water resistance compared to straight oils. These products typically combine mineral oil with natural beeswax, creating a protective film that repels moisture while maintaining food safety. The wax component provides longer-lasting protection but requires more frequent reapplication in high-use areas.
Application involves warming the blend slightly for easier spreading, though this step adds complexity to the maintenance routine. The natural ingredients appeal to users preferring less processed options.

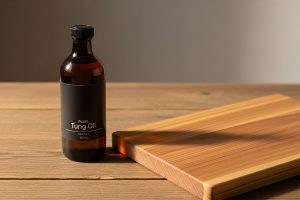
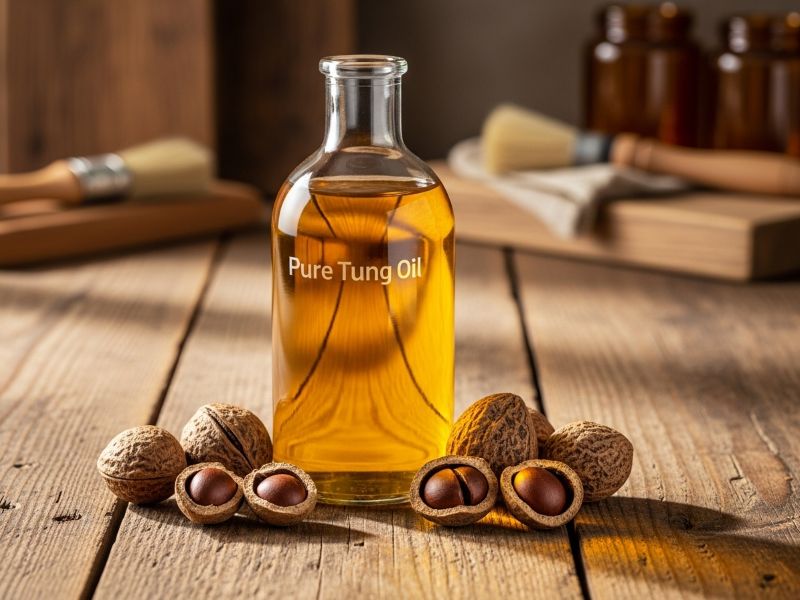
Tung Oil
Pure tung oil creates durable finishes through polymerization, forming hard protective layers on wood surfaces. This natural oil, extracted from tung tree nuts, offers excellent water resistance and creates beautiful finishes on wood grain patterns.
However, tung oil requires complete curing between coats, extending application timeframes significantly. The curing process can take 24-48 hours per coat, making this option impractical for frequently used surfaces. Additionally, some commercial tung oil products contain drying agents that may not be food-safe.
Walnut Oil
Cold-pressed walnut oil provides natural conditioning with pleasant nutty characteristics. This food-grade option penetrates wood effectively and enhances grain patterns beautifully. The oil comes from natural sources and aligns with preferences for minimally processed products.
The major caveat involves nut allergies. Households with walnut sensitivities must avoid this option entirely. Additionally, walnut oil can turn rancid over extended periods, requiring more frequent reapplication than mineral oil alternatives.
Specialty Wood Conditioners
Branded products from manufacturers like Howard Products, John Boos, and WOCA offer formulated solutions designed specifically for butcher blocks. These conditioners often combine multiple ingredients to optimize penetration, protection, and ease of use.
Premium conditioners typically cost more than basic mineral oil but may provide enhanced performance and convenience. Some products include application tools or specific instructions for optimal results.
Oils to Avoid
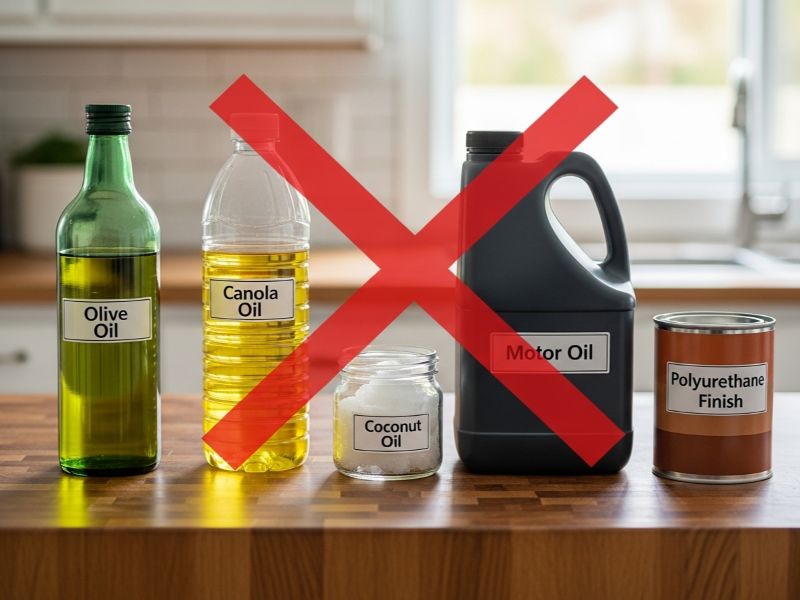
Vegetable oils including olive, canola, and coconut oil turn rancid when exposed to air and temperature fluctuations. Rancid oils create unpleasant odors and potentially harmful compounds on food preparation surfaces. Similarly, motor oils and non-food-grade petroleum products contain additives unsafe for food contact.
Polyurethane and other film-forming finishes create sealed surfaces unsuitable for cutting and food preparation. These products prevent proper cleaning and maintenance of wood surfaces.
| Oil Type | Food Safety | Durability | Cost | Ease of Use | Reapplication Frequency |
|---|---|---|---|---|---|
| Mineral Oil | Excellent | Good | Low | Very Easy | Monthly |
| Beeswax Blend | Excellent | Very Good | Medium | Moderate | 6-8 weeks |
| Tung Oil | Good* | Excellent | Medium | Difficult | 3-6 months |
| Walnut Oil | Good** | Fair | Medium | Easy | Bi-weekly |
| Specialty Conditioners | Excellent | Good-Very Good | High | Easy | Monthly |
- Requires pure, food-safe formulation – **Not suitable for nut allergies
How to Oil a Butcher Block (Step-by-Step Guide)
Proper application technique ensures optimal oil penetration and surface protection. The process requires minimal tools but demands attention to detail for best results.
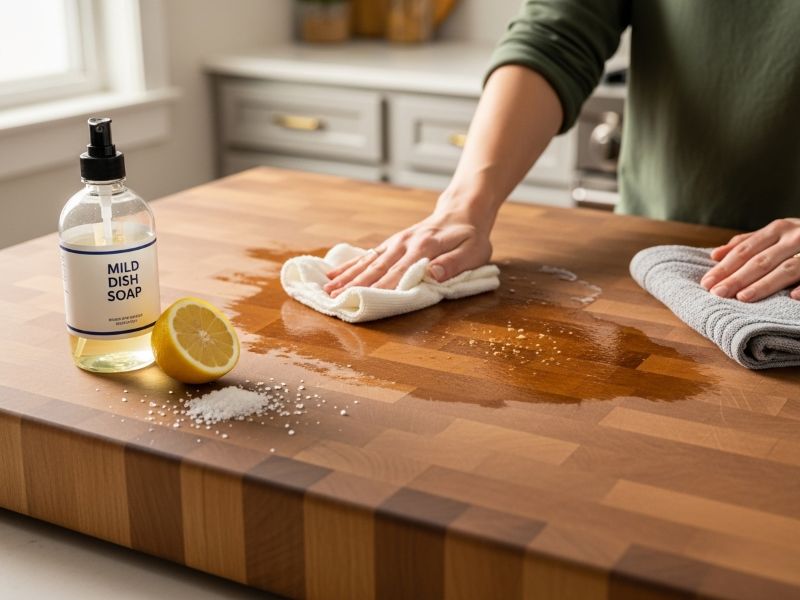
Step 1: Clean and Dry Thoroughly
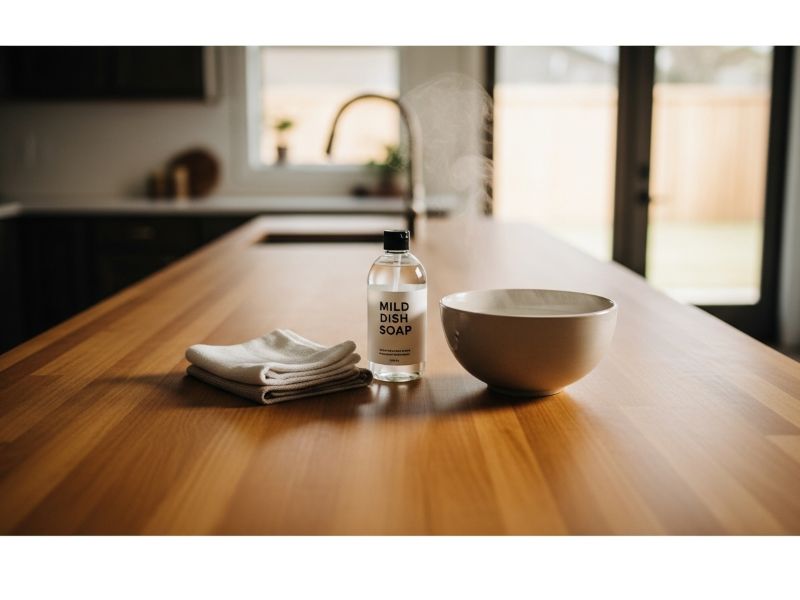
Wipe down the butcher block surface with a damp cloth and a small amount of mild dish soap. Focus on removing food particles, grease, and everyday spills. For tougher spots, use a plastic scraper or sprinkle a little coarse salt with lemon/vinegar as a natural cleaner.
Avoid soaking the surface with too much water – instead, use a lightly damp cloth and follow with a dry towel. Let the butcher block air-dry fully (usually 2-4 hours depending on room humidity) before applying oil. Applying oil on damp wood prevents proper absorption and may trap moisture inside.
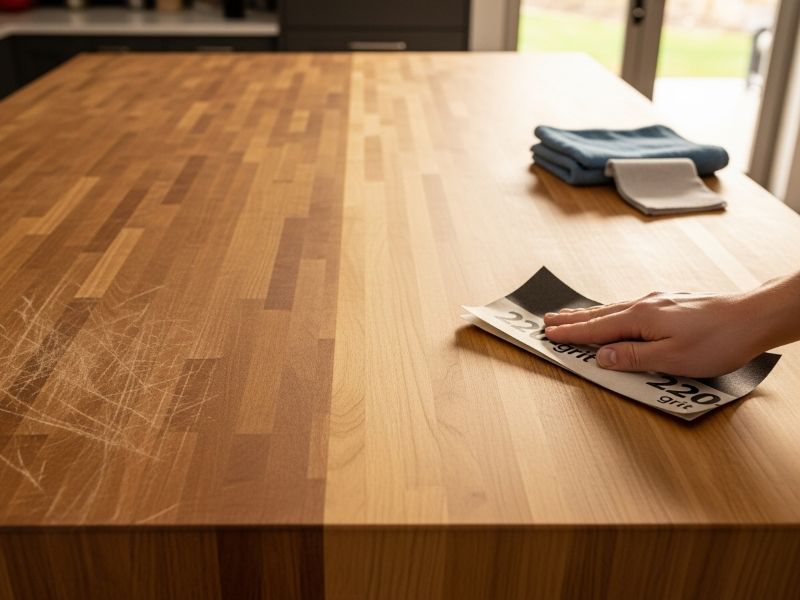
Step 2: Sand if Rough or Damaged
Inspect the surface for rough spots, knife marks, or raised grain. Light sanding with 220-grit sandpaper smooths imperfections and opens wood pores for better oil absorption. Sand with the grain direction to avoid cross-grain scratches that become visible after oiling.
Remove all sanding dust with a tack cloth or microfiber towel before proceeding. Dust particles mixed with oil create muddy finishes and prevent smooth application.
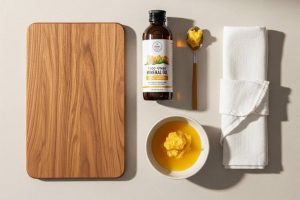
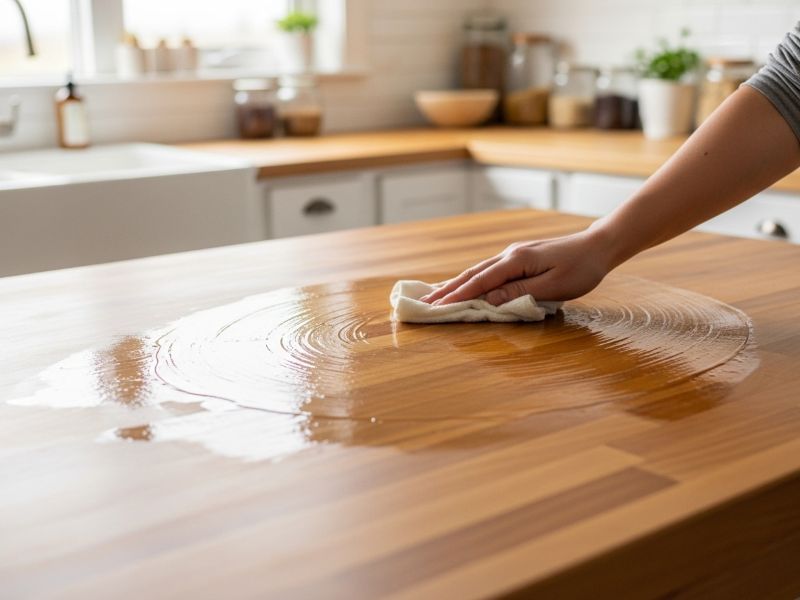
Step 3: Apply Oil Generously
Pour oil directly onto the wood surface, using approximately 1 tablespoon per square foot for initial applications. Spread oil evenly using a clean cloth, ensuring complete coverage including edges and any grooves or joints.
Work oil into the surface using circular motions followed by straight passes along the grain direction. Pay special attention to end grain areas that absorb more oil due to exposed wood fibers.
Step 4: Allow Proper Soaking Time
Different oils require varying absorption periods for optimal penetration. Mineral oil typically needs 15-20 minutes for initial coats, while tung oil may require 30-45 minutes. Beeswax blends often absorb within 10-15 minutes due to their consistency.
Monitor the surface during soaking – properly thirsty wood continues absorbing oil, while saturated areas begin pooling excess oil on the surface.
Step 5: Wipe Off Excess Oil
Remove all surface oil that hasn’t been absorbed into the wood using clean, lint-free cloths. Leaving excess oil creates sticky surfaces that attract dust and debris while potentially affecting food flavors.
Check for missed spots or uneven coverage, applying additional oil to areas that appear dry or inadequately treated.
Step 6: Repeat Coats if Needed
New or very dry blocks may require multiple coats for complete conditioning. Apply subsequent coats using the same technique, allowing full absorption between applications. Most blocks achieve adequate conditioning within 2-3 coats during initial treatment.
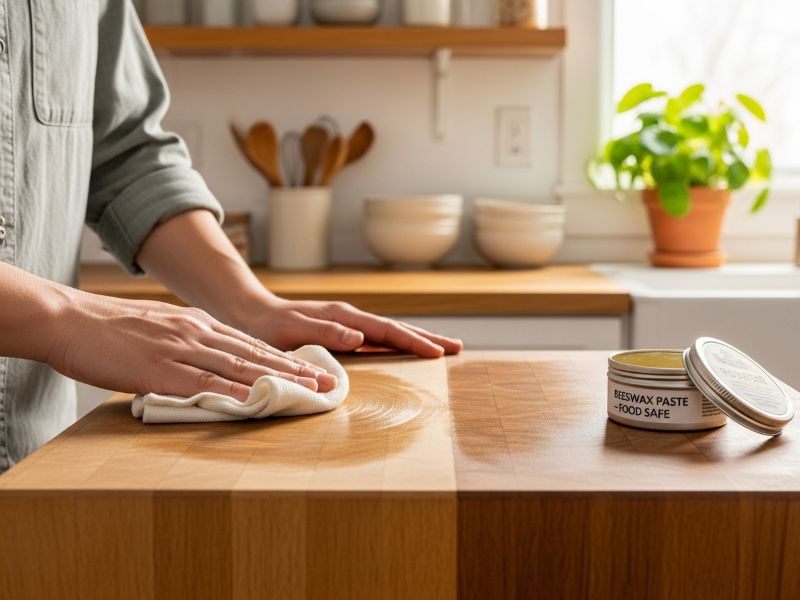
Optional: Buff with Wax
For enhanced protection, apply a thin coat of food-safe paste wax after the final oil application has cured. Buff the wax to a soft sheen using circular motions, creating additional water resistance without compromising food safety.
Maintenance Tips for Oiled Butcher Blocks
Proper care keeps your butcher block beautiful, durable, and safe for food prep. With consistent attention, these surfaces can serve your kitchen for decades.
Reapply Oil on Schedule: Wood dries out over time, especially with heavy daily use. Apply food-grade mineral oil about once a month for frequently used blocks. For seasonal changes – like dry winters or humid summers – give your block a deeper conditioning to maintain moisture balance and prevent cracking.
Use Gentle Cleaning Methods: For daily care, wipe the surface with a soft cloth, warm water, and a small amount of mild dish soap. Avoid bleach, ammonia, or abrasive pads, as these can strip away protective oils and roughen the wood. After cleaning, immediately dry the surface with a clean towel to prevent standing water, which can cause swelling or encourage bacterial growth.
Separate Surfaces for Raw Meat: Always prepare raw proteins on a dedicated cutting board instead of directly on your butcher block. This minimizes cross-contamination risks, keeps your block sanitary, and reduces the need for deep scrubbing or frequent re-oiling.
Control Indoor Conditions: Stable humidity levels between 30–50% help prevent the wood from shrinking, expanding, or warping. Use a humidifier in dry winter months or a dehumidifier in very humid climates. Keep your butcher block away from heat vents, dishwashers, or areas with frequent temperature swings.
Ensure Proper Ventilation: Since butcher blocks are fixed in place, good room ventilation is key. Make sure the kitchen has proper airflow (e.g., open windows, use an exhaust fan, or run a dehumidifier in humid climates). Adequate air circulation helps the wood maintain a stable moisture level and reduces the risk of mold, mildew, or long-term deterioration.

With these habits, your oiled butcher block will stay strong, safe, and attractive for many years.
Common Mistakes to Avoid When Oiling a Butcher Block
Understanding frequent errors helps ensure successful butcher block maintenance while avoiding damage that requires expensive repairs or replacement.
- Using cooking oils instead of food-grade mineral oil: Vegetable oils, including olive and coconut varieties, eventually turn rancid when exposed to air and temperature changes. Rancid oils create unpleasant odors and potentially harmful compounds on food preparation surfaces.
- Skipping thorough cleaning and surface preparation: Applying oil over food particles, grease, or cleaning residue prevents proper penetration and can seal contaminants into the wood. Always clean completely and allow full drying before oiling.
- Over-oiling without removing excess: Leaving surface oil creates sticky, dust-attracting surfaces that feel unpleasant and may affect food flavors. Always wipe away oil that hasn’t absorbed within the recommended timeframe.
- Not allowing adequate absorption time: Rushing the process by wiping oil too quickly prevents deep penetration that provides lasting protection. Different oils require specific absorption periods for optimal results.
- Using non-food-safe products: Motor oils, furniture polishes, and other household products contain chemicals unsuitable for food contact surfaces. Only use products specifically labeled as food-safe for butcher block maintenance.
- Ignoring environmental factors: Extreme temperatures, humidity changes, and poor ventilation affect oil performance and wood stability. Consider environmental conditions when scheduling maintenance and storage.
Conclusion – From Dry to Durable: Keeping Your Butcher Block Alive
Proper butcher block maintenance transforms raw wood into durable, sanitary food preparation surfaces that serve kitchens for generations. The process centers on three core benefits: structural protection through fiber hydration, contamination resistance through barrier creation, and enhanced beauty through grain nourishment.
The most effective approach combines food-grade mineral oil applied monthly with consistent cleaning practices and environmental awareness. This simple routine prevents the costly damage that results from neglect while ensuring safe food preparation surfaces.
Three key takeaways guide successful butcher block care: choose food-safe oils exclusively, maintain regular application schedules based on usage patterns, and address problems early before they require extensive repairs. Proactive maintenance costs significantly less than replacement while providing superior performance throughout the block’s service life.
Your butcher block represents both a functional workspace and a kitchen centerpiece. With proper care and by following a clear guide on How to Oil a Butcher Block, it develops character and beauty that only improve with age – becoming a cherished tool that connects you to generations of cooks who valued quality wood surfaces. Investing in regular maintenance pays off in performance, safety, and long-lasting satisfaction.
Read more: How to Finish Butcher Block Countertops: Complete Step-by-Step Guide with Best Finishes